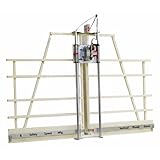
Has anyone build there own Panel saw
I was just woundering if anyone build there own panel saw and plase dont gave me all these web site's it's one thing to talk about it and another to do it so one day I cut 3/4 plywood the next I would be cutting big sheets of plasice so any help would be nice.
Views: 6476
Replies to This Discussion
-
Permalink Reply by Jay Boutwell on
-
David, old friend, how is your day? About 12 years ago I build a panel saw for a customer of mine who worked at laying underlayment for flooring in houses and buildings when the building industry was booming. He cut a lot of sheeting both partical board and plywood in his business.
I made the saw out of steel angle iron for the frame. For the rails I used two steel heavy thick walled electical conduit pipe of which I jigged in to a metal lathe and trued them up so that they were straight. I made the saw carriage out of two thick aluminum plates and mounted a milwaukee saw onto the carriage. I made the carriage bearings using 8 ball bearings that I made adjustable adapters for and mounted them to the bottom piece of the carriage . The two pieces of machined surfaced aluminum plate were attached in the center with a machined threaded type bolt that I made on the lathe. A thin coat of greese allowed the two pieces to swivel without friction drag. This allowed the top plate to swivel independant of each other and lock from a 90 degree vertical to a 90 degree horizonal for cutting both up and down as well as horizonal. I made a carriage lock to lock the saw carriage in any position on the rails. This lock is mounted to the bottom plate. For horizonal cuts you pushed the sheets from left to right through the saw. The swivel lock on the carriage was a simple through bolt with a knob you tightened to lock the swivel. The bottom carriage piece was slotted in an arc to allow the swivel bolt to track in an arc. The carriage rail lock was a simple "squeeze lock" welded to the Bottom carriage plate and locked by twisting a bolt tight using a knob. It is made like "U yoke and fit over the rail and by tightening the knob it squeezed onto the rail. Simple but effective.
The track for the material to slide on to position them to cut was made out of steel in a "U" shaped channel and in that channel, a series of steel bearing rollers that I cut down and rewelded to make a rolling slide effect for the material to move back and forth without having to drag the sheets on a flat bottom channel. I got them from an old rolling track from a food processing plant. These are the same type you see in some rolling off fall stands used in woodworking. It took several as I cut the tubes to fit and re-welded the bearing ends so that they fit. I place them about every 4 inches in the "U" channel.
A set of steel cables were attached to the carriage and ran over the top in pulleys and attached to coiled springs to return the saw to the top once a cut was made. This also held the saw in the upright postion allowing you to move the sheet goods into alinement to do the cut.
The carriage could swivel and lock from a 90 degree vertical to a 90 degree horizonal for cutting both up and down as well as horizonal. The carriage locked the saw carriage in any position on the rails. For horizonal cuts you pushed the sheets from left to right through the saw.
This was all the set on a utility trailer that was moved to the job sites along with his load of underlayment. He pulled a sheet and made his cuts and it was then installed in the buildings. I do not have plans for it as I like you do not build using plans and fabricated it piece by piece as i progressed through the job. I could draw up some plans should you be interested. You will need access to a metal lathe and welding equiptment to do this and have some knowledge in metal working using a lathe and welding equiptment. A lengthy project but fun and definately rewarding considering the cost of a panel saw. Investment less that $500.00 including the saw.
-
Permalink Reply by David Dean on
-
Thanks Jay would a slide system work I got a good saw cat saw and I dont have anything like that so its wood and scerws and glue you and your family have a good christmas.
-
-
David slide system works well but expensive. Dewalt has some models that are called track saws however the one. if you are ripping a 8 ft piece of plywood the track for this one is pretty expensive. Rockler has one that has a 59 inch track that is reasonable if you are wanting to cross cut plywood. My method is is using the table saw of which I rip my plywoods on it. Since most of my cabinet building is 24 inches in width or debth I use a sliding table on my saw that give me excellent accuracy and control. I rip the sheets in half first using the saw fence and then cut them to final length on the slide table. I can also cut angles on this table with accuracy. I use the slide table to cut my rails and stile materials to length after I rip them on the table saw. Although I have a good miter saw I seldom use it as it is too handy just to use the table saw and slide table. It works well for me otherwise I would build myself a panel saw. My objection to a panel saw is that they take up alot of wall space as to rip a 8 ft piece of plywood you will need better that 16 feet of wall length . Set some photos of a panel saw around the house like on the kitchen table or counter and maybe Santa or Mrs. Santa will get you one in a few days. Have a good Christmas.
David Dean said:Thanks Jay would a slide system work I got a good saw cat saw and I dont have anything like that so its wood and scerws and glue you and your family have a good christmas.
-
Permalink Reply by Ken Darga on
-
re panel saws---
When cutting panels/sheet stock, or the like,
the panels need to be held snug against the supporting rack/frame.
Thinner panels have a tendency to lift up (not stay flat against the frame), and you don't get an accurate 90 degree cut.
When cutting plywood, I've found chipping occurs along the cut edge---
perhaps some of it due to the panel not flat against the frame.
As Jay has pointed out, a panel saw takes up lots of space.
8 ft on each side of the saw track plus clearance to load and unload.
ALTERNATE METHODS:
I prefer to lay my panels flat, when cutting sheet goods.
a. Laying a 2'' thick sheet of rigid insulation board on the driveway, patio, or the like,

b. laying the sheet section of 2x stock, placed on the driveway and evenly spaced to support the panel, or
c. 2x stock placed on sawhorses

d. folding stands with 2x stock, spanning the frame---
rest the sheet goods on 2x stock.
I like this style stand---stores flat---chain-links allow for verticle adjustment, from 12'' to about 48''.
These work out great for me---set-up on the driveway, patio, lawn, indoors use, for on-the-go and job-site set-up use.
They are very handy---for machining sheet goods as well as doors.
(TIP: make a work table top of 3/4 stock with 2x frame on the underside, that engages with the cross-members on the frame, to hold the work-top in place).

e. This style is nice, you can adjust it vertically---
span 2x stock between the top members, forming an ''H" frame,
and rest the sheet goods on the 2x stock frame members.
I've used several versions---
however, ''d & e'' are my most preferred and useful set-ups.
They take up the least storage space, when not in use.
-
-
It anit as much 8x4 stock but ode size stuff I got so I was thing 5 tall and 6 long back framing would be 1 1/2x1 1/2 s and the front rials out of 3/4x3x6' plywood and a cross member for the saw.
-
Permalink Reply by Jens Jensen on
-
David I just sent u plans for one
-
-
Thanks Jen
-
-
Ok its rough but this is what I got right now and if I done my math right I thank it well double for a clamp table and hang on the wall as well.
-
Permalink Reply by Robert Brennan on
-
Hello David
I cut both of the types of the material you refer to on my 10" table saw,
I haven't modified the saw as such but I did add rollers and other types of supports to allow me to cut large sheets of material safely on my own.
All I did was simply attach beams underneath the Cast Iron web frame and build up the difference (gap of the table) to support the material.
I didn't consider the precise height to be any concern as the actual table and rip fence supported the timber and the infeed supports just made handling easier, the outfeed. well the material was cut anyway so its role was again to support both pieces
I always found that plastic (sawdust) seemed to have some affinity to me and stuck all over me (and everywhere else too) even with a vac operating
-
-
Well I get lote of stuff that doesnt have a striaght edge on them I got 2 sheets of that 1/4" plastic 10'x10' Im useing it for the walls in the shop I got these 5'x4' sheets of soming that looks like cardbourd and 3/4" thick but the egde's suck so I got to cut them striaght so they can be used for rifter's and on top of that folks are whating biger furniture.
-
-
this is what I got build so far.
-
-
David looking real good so far. What you have done is somewhat the same thing I was talking about only I did it with metal. The frame looks good and once you add the rails for the saw you will be in business. I don't know what you are using for rails but what I used was thich walled electrical conduit. Looking forward to seeing your finished saw. Your are right it would double as a framing table. Thanks for the update post as I was wondering what you were up to.
Need Help?
For Technical Support, please call 800-447-8638 or send a message. Reps are available Monday through Friday from 8am to 5pm CST.
Popular Posts & Projects
Videos
Forum
Jig settings for 2 ¾ x 1 ½ boards with 30 degree miters?
I making a hex ring out of 2x4s ripped to 2 ¾ inches wide with 30 degree miters. What setting on the Jig should I used? 1 ½ is too much. Thanks.Continue
Started by Patrick Halinski in Kreg Jig® Operation Dec 30, 2023.
40mm Cup Hinge Jig Question
Hi All.....I have the 35mm Kreg Jig hinge drill guide. The guide is great for 35mm Hinge Cups, but I have a speciality 40MM hinge cup to drill.Has anyone adapted the Kreg guide to work with 40mm Forsner drill bits? Or have a guide that works…Continue
Started by Ed Anderson in Beginners' Zone Oct 3, 2023.
Product Reviews
New Kreg 720Pro
I saw the video Kreg put out for this new jig and had high hopes for it.
I purchased one today and am very disappointed with it.
First the docking station is extremely cheap. The plastic is pathetic. A Lego has more…
ContinuePosted by Duke Leon on February 15, 2021 at 9:00pm
Not Pleased With Pocket Hole Construction
Several months ago, I purchased the Kreg K4MS so that I could build the Lego Table as outlined on the companion "buildsomething" web site which exclusively uses pocket hole construction. I have considerable experience with conventional…
ContinuePosted by Robert Ringel on September 17, 2020 at 1:48pm — 9 Comments
© 2024 Created by KregRep.
Powered by
![]()
Badges | Report an Issue | Privacy Policy | Terms of Service