table saw
Table saw stand, saved space and added storage.
Views: 535
Projects: Garage Organization
Location: Dayton, OH
Comment
-
Comment by Ken Darga on April 2, 2013 at 5:58pm
-
Justin,
The saw should be fastened securely to the stand--- (min 1/4'' bolts).
Add some weight in the bottom of the stand, so as to reduce the risk of it tipping over, when using the saw or moving it around.
I recently witnessed a saw, on a small size stand, that toppled over.
it was not a pretty site.
The work-piece was too large to be cutting on that little table surface area.
It's top heavy, and subject to potential tipping.
Table saws can be extremely dangerous.
When an accident happens, its too late.
-
Comment by Justin on April 2, 2013 at 2:41pm
-
This is great information, I can't wait to try it out. Thanks Ken!! I'll let you know if I have any followup questions.
-
-
...cont'd...
Mark for applicable hinges and locations, on the door frame and cabinet walls. If using flat butt hinges, recess the hinge flanges into the door stiles and cabinet side ---the recess to be the thickness of the hinge flange.
Mark the locations, for the hinges, on the door frame stile and the cabinet wall.
Locate the top hinge 2-1/2’’ down from the top of the door frame, and 2-1/2’’ up from the bottom of the door frame.
Install the hinges on the door frame first, then position the doors in place, use spacers as noted herein, followed by marking for the hinge location on the cabinet frame.
Mark and scribe lines for the hinges to be recessed---chisel out material, for each hinge so it is flush with the surface. (If you make the cuts too deep, don’t worry, use a shim made from file card (3x5) stock, to make up the difference).
-
-
#1. Before proceeding with making the doors, insure the cabinet opening is square.
Measure diagonally, across the inside corners of the cabinet---
make adjustments in the cabinet so the opening is ‘’dead-on’’ square.
Measure the inside opening between the cabinet side panels---width & height.
Deduct 1/16’’ space on each side, top, bottom and between doors.
Divide the width by 2---the result will be the width for each door.
The 1/16’’ gap on the door sides, top and bottom and between the doors, allows for clearance.
Use 1/16’’ spacer shims, (or a nickel coin), to accurately position the doors, when installing the hinges.
Place a nickel in position, to insure there is even spacing around and between the doors.
Suggested panel doors:
Rails and stiles, 2-1/2”w x ¾’’ thick stock, pine or fir.
Make a groove 3/8’’ deep by ¼’ wide---locate the groove back ¼’’ from the front face of the door frame, in each rail and stile. The groove width to accept the tongue on the rail and the ¼’’ thick panel.
(The panel is to insert into the groove---top, bottom and both sides in the door frame).
Make a 3/8” long tongue on the end of each rail, for the tongue to fit into the groove in the stiles.
Make the panel, width and height, to fit into the grooves, but cut it 1/8’’ smaller, so there is slight gap inside the grooves, to allow for a loose fit of the panel. (The panel should set loosely into the frame. A tight fight could result in distortion, when there is any movement that occurs during climate changes).
Make a ‘’dry fit-up’’, to insure all members join together nicely.
Seal/stain and apply a finish coat to the panels, before installing in the door frame. Apply an extra coat on all ends of the panels.
Final assy of the doors:
Do a dry fit, before glue up and adding screws.
Insure the door is square---measure diagonally across corners.
Assemble the rails and stiles with 1-1/4’’ pocket hole screws. Locate the pocket holes and screws on the inside of the door frame.
Apply glue evenly, on the tongue, using an acid brush, or the like.
Slip the tongue of the rail into the groove of the stile.
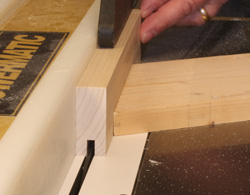
Cutting a ¼’’ groove on a table saw. Groove width to fit the tongue on the rails, and the ¼’’ plywood panel.
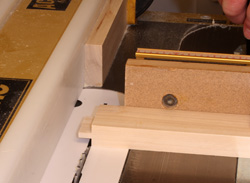
Cutting the tongue on a table saw.
Make the tongue so it fits loose fit into the groove on the stiles.
You don’t want a force fit, and you don’t want any play. Just slide in to position.
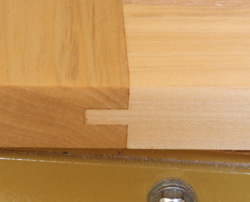
Tongue & groove joined
Completed door---LH & RH.
(cont'd next page)

-
-
Thanks Ken, it was actually already in the works. I do have a question, how do you measure and cut doors? I want these to be flush.
-
-
Justin,
I'd recommend adding a ''back'' on the base/stand, so as to prevent racking.
-
-
Simple build but really functional. If it works, it works! Great job and off to a good start on organizing the shop.
Need Help?
For Technical Support, please call 800-447-8638 or send a message. Reps are available Monday through Friday from 8am to 5pm CST.
Popular Posts & Projects
Videos
Forum
Jig settings for 2 ¾ x 1 ½ boards with 30 degree miters?
I making a hex ring out of 2x4s ripped to 2 ¾ inches wide with 30 degree miters. What setting on the Jig should I used? 1 ½ is too much. Thanks.Continue
Started by Patrick Halinski in Kreg Jig® Operation Dec 30, 2023.
40mm Cup Hinge Jig Question
Hi All.....I have the 35mm Kreg Jig hinge drill guide. The guide is great for 35mm Hinge Cups, but I have a speciality 40MM hinge cup to drill.Has anyone adapted the Kreg guide to work with 40mm Forsner drill bits? Or have a guide that works…Continue
Started by Ed Anderson in Beginners' Zone Oct 3, 2023.
Product Reviews
New Kreg 720Pro
I saw the video Kreg put out for this new jig and had high hopes for it.
I purchased one today and am very disappointed with it.
First the docking station is extremely cheap. The plastic is pathetic. A Lego has more…
ContinuePosted by Duke Leon on February 15, 2021 at 9:00pm
Not Pleased With Pocket Hole Construction
Several months ago, I purchased the Kreg K4MS so that I could build the Lego Table as outlined on the companion "buildsomething" web site which exclusively uses pocket hole construction. I have considerable experience with conventional…
ContinuePosted by Robert Ringel on September 17, 2020 at 1:48pm — 9 Comments
© 2024 Created by KregRep.
Powered by
![]()
Badges | Report an Issue | Privacy Policy | Terms of Service
You need to be a member of Kreg Owners' Community to add comments!
Join Kreg Owners' Community