Mounting your jig
Thanks
Views: 20200
Replies to This Discussion
-
Permalink Reply by David Dean on
-
i have a k2 i use a 24x30 and clamp it to my work bunch
- Attachments:
-
-
 IMG_3270.jpg, 521 KB
-
-
Permalink Reply by Chris L on
-
I just saw this post on my Facebook page. So sorry I am late. I have my K3 mounted to a piece of laminate that I just clamp to my bench. I have some T-track that I bought to put into the laminate for stops and also a clamping system.
Seeing this post reminded me of this fact and I took everything out to work on it but decided it is too late right now so perhaps tomorrow evening. I will post some pics of the finished product here.
CtL
-
Permalink Reply by Pagan Wizard on
-
I have mine mounted to a 24X48 piece of 3/4 inch thick plywood. I will either clamp it down to a table/bench or onto a couple saw horses.
-
Permalink Reply by Kerry Drake on
-
I have actually "unmounted" my jig from the plywood (so it will fit in the toolbox), and now just clamp the jig directly to the workbench.
-
-
Great idea with the tool box!
Kerry Drake said:I have actually "unmounted" my jig from the plywood (so it will fit in the toolbox), and now just clamp the jig directly to the workbench.
-
Permalink Reply by David Roberts on
-
i mounted it to 1/2 inch MDF 2.5 feet x 18 inches or so. It was scrap I had laying around. i just clamp it to my work bench. before that i just screwed it into my workbench but that got old pretty quick.
-
-
I used the (approx) 16 x 20 highly figured board. (Why not? I have a high end KREG pocket hole jig. I haven't had to clamp it to my bench yet.) Talk about ease of use and portability..After I became familiar with my unit, I went back to Woodcraft and proceeded to customize my set up. Extra stops, 3 extra drill bits, clamps of all types, generous amounts of screws, etc. I already had two 19.2 volt cordless drills. One for drilling, the other for driving screws. One of my daughters-in-law bought me a 19.2 volt laser guided 7 1/4 saw, four batteries, and two one hour chargers. Coupled with my new KREG, I had arrived. Attempting to brag? Certainly not! My point is, with KREG, you have the option and ability to customize to fit your personal wants and needs. My personal cash outlay is about $500.00 I couldn't have shoplifted all this at a better price. I don't represent KREG Tools, nor am I authorised to speak for them. It is just that this equipment is worthy of a ton of positive comments. My opinion is same as yours, why should I drive a Model T when I have a Rolls Royce? This morning, I'm headed back to Woodcraft to get an extra drill guide for my portable attachment. NOTE: The pictures represent the way my unit is set up. MANY THANKS TO ALL! Buck Fleshner, Santa Rosa, CA. 9-9-09
Kerry Drake said:I mounted my jig to a piece of plywood about 16" x 20" and then I clamp the whole thing down to the workbench when I use it.
I'll take a couple pictures tonight and post them here tomorrow.
-
-
I got sick that weekend and never made it back to the shop. So here is the new improved version finally.
Not much but it seems to hold on pretty well. May decide to mark the board for different depths.
Have fun all. CtL
Chris L said:I just saw this post on my Facebook page. So sorry I am late. I have my K3 mounted to a piece of laminate that I just clamp to my bench. I have some T-track that I bought to put into the laminate for stops and also a clamping system.
Seeing this post reminded me of this fact and I took everything out to work on it but decided it is too late right now so perhaps tomorrow evening. I will post some pics of the finished product here.
CtL
-
Permalink Reply by Derek on
-
I saw this one on "Stu's Shed" Blog. This would certainly be a nice setup for working with large panels.
-
Permalink Reply by KregRep on
-
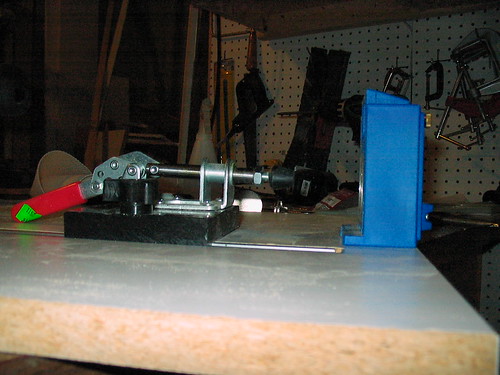
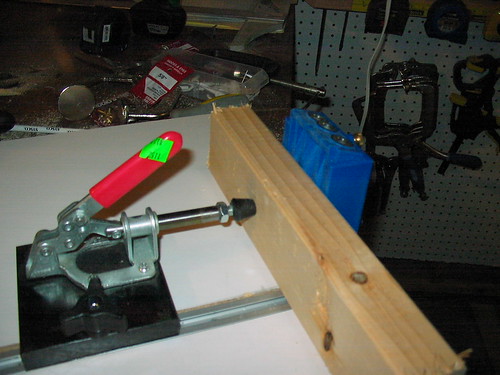
Connecting a Kreg Jig (K4) directly to a workbench with a Kreg Face Clamp.

-
Permalink Reply by Stanley C. Pearse on
-
I have mine mounted to a piece of plywood. When not in use it is stored away. I cannot believe how much I have used it for functional projects around the house.
-
-
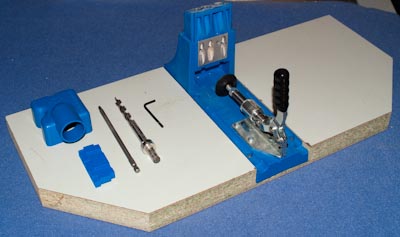
I designed and built this jig for my K3 Master System. It clamps to my workbench and is easily removed when not in use.
The jig is composed of 3/4" prefinished maple plywood, pocket screwed together in an L shape. I fabricated a vacuum coupling using Shop-Vac 906-87 Universal Tool Adapter and then added the Kreg KMS7506 mini trak and Kreg KJSS material support stops. I drilled a small hole in the top to insert the allen wrench used to adjust the drill bit depth stop. - Attachments:
-
-
IMG_5698.JPG, 2.1 MB
-
IMG_5699.JPG, 1.6 MB
-
IMG_5702.JPG, 2.1 MB
-
Need Help?
For Technical Support, please call 800-447-8638 or send a message. Reps are available Monday through Friday from 8am to 5pm CST.
Popular Posts & Projects
Videos
Forum
Free Hand Guard (dust collection)
Hi. I'm wondering if anyone has used the Woodpecker Free Hand Guard for dust collection on their bench top router table during pattern routing. How effective is it? It's adaptable to any router table. Continue
Started by Keith Morgan in Beginners' Zone Nov 8.
Keg Easy-Step Collar and XL 1 Reply
Does Keg Easy-Step Collar work with Kreg XL?
Started by Nick in Beginners' Zone. Last reply by Ken Darga Oct 28.
Product Reviews
New Kreg 720Pro
I saw the video Kreg put out for this new jig and had high hopes for it.
I purchased one today and am very disappointed with it.
First the docking station is extremely cheap. The plastic is pathetic. A Lego has more…
ContinuePosted by Duke Leon on February 15, 2021 at 9:00pm
© 2024 Created by KregRep.
Powered by
![]()
Badges | Report an Issue | Privacy Policy | Terms of Service