Outdoor garbage can holder
Thanks
Views: 14743
Replies to This Discussion
-
Permalink Reply by James Waller on
-
I have not seen many of that kind of project come through here and doing a search only showed one discussion for an office garbage bin here on the community.
Now you can do a search through your favorite engine (like Google) and see images (maybe some lead to plans) and also look at the videos that may show you how to build a garbage bin.
I imagine the cheapest way to build one was to use wood from pallets or from construction sites.
-
Permalink Reply by James P. Cottingham on
-
You didn't mention if you wanted a mobile holder or not. See if Free Woodworking Plans has anything that you can use.
-
Permalink Reply by mike on
-
I don't want it to mobile. I looked at those plans and none are that interesting. I will keep searching around and post what I find.
Thanks
-
Permalink Reply by David Dean on
-
Hey mike can you take a picture of the trash can I got one lady whating one for her in side so Ill kill two brids with one stone.
-
-
I have attached photo's. I have two of each.
- Attachments:
-
-
 2013-01-22 16.28.50.jpg, 3 MB
 -
2013-01-22 16.28.15.jpg, 3.6 MB
-
-
-
ok got that the round trash can have you thought about a tin rap around for it. gave me a fow days to come up with somthing on the other's.
-
-
Thanks, I will send pic of something that looks pretty good when I get to home computer.
-
-
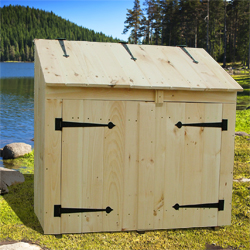
I am not looking for anything fancy. This design looks nice and seems like it would be simple to do. Let me know what you think of this.
David Dean said:ok got that the round trash can have you thought about a tin rap around for it. gave me a fow days to come up with somthing on the other's.
-
-
its batter than what I was thanking.
mike said:I am not looking for anything fancy. This design looks nice and seems like it would be simple to do. Let me know what you think of this.
David Dean said:ok got that the round trash can have you thought about a tin rap around for it. gave me a fow days to come up with somthing on the other's.
-
-
Mike,
You can construct a rectangular object, using pressure treated wood.
You want a suitable enclosure to keep the varmints out of the trash.
I'd suggest it include hinged doors at front, and with hinged lids.
Position a lid over each receptacle.
Make it with a bottomless floor, to allow for drainage.
Rest the structure onto a foundation.
A foundation can be made from blocks, bricks, or river rock.
The foundation can be flush with the round surface or elevated 1-2''.
Some photos to give you some design ideas.
 ,
, ,
-
-
Well Ken I was thanking of the cost some pressure treated 2x4s and a sheet of that V baord that come's in 4x8 sheet pressure treated for the side's house's and some paint and a tube conking for the Kreg hole's so the rain dosent stand in them
-
-
Pressure treated lumber, is available is a variety of forms---
1x and 2x stock
sheet goods, like the T1-11 siding.
Dog-eared fencing 5/8'' x 6'' (cedar) is economical, and suitable for exterior use.
(Off-season price can be as low as $2 a board. When at this price, I stock-pile some for future planned projects).
Another cedar board, is the 1/2 x 4---I've found some for about .75 cents a board.
For the board construction---
construct a frame from 2x stock and fasten the perimeter boards vertically,
with the lid boards front-to-back.
The cedar fencing materials are much lighter in weight than the pressure treated sheeting materials.
The fencing materials (noted above), when butted, will allow for ventilation.
(Trapping rotting product will promote undesirable odors, which attract the unwanted critters. Akin to placing garbage in a plastic barrel and covering it with a tight fitting lid).
Fasteners---use material suitable for exterior use and for the material being used, to build the structure.
I wouldn't plug or fill the screw holes---leave them exposed to facilitate rapid drying.
(Trapped moisture will lead to rotting).
The materials, noted above, can be sealed with ''Boiled Linseed-Oil''.
The first seal-coat, apply a thinned version---1 part linseed oil with 2 parts mineral spirits, stirred to make a homogeneous mixture. This will result in a deeper penetrating seal.
Followed by 2-3 coats of the oil.
Allow 3-5 days of drying time between coats.
The cedar boards make for a nice natural wood-toned finished product.
Skip the paint on cedar---unless the end result is desired to blend into other surrounding structure(s),
Works for me.
Need Help?
For Technical Support, please call 800-447-8638 or send a message. Reps are available Monday through Friday from 8am to 5pm CST.
Popular Posts & Projects
Videos
Forum
Jig settings for 2 ¾ x 1 ½ boards with 30 degree miters?
I making a hex ring out of 2x4s ripped to 2 ¾ inches wide with 30 degree miters. What setting on the Jig should I used? 1 ½ is too much. Thanks.Continue
Started by Patrick Halinski in Kreg Jig® Operation Dec 30, 2023.
40mm Cup Hinge Jig Question
Hi All.....I have the 35mm Kreg Jig hinge drill guide. The guide is great for 35mm Hinge Cups, but I have a speciality 40MM hinge cup to drill.Has anyone adapted the Kreg guide to work with 40mm Forsner drill bits? Or have a guide that works…Continue
Started by Ed Anderson in Beginners' Zone Oct 3, 2023.
Product Reviews
New Kreg 720Pro
I saw the video Kreg put out for this new jig and had high hopes for it.
I purchased one today and am very disappointed with it.
First the docking station is extremely cheap. The plastic is pathetic. A Lego has more…
ContinuePosted by Duke Leon on February 15, 2021 at 9:00pm
Not Pleased With Pocket Hole Construction
Several months ago, I purchased the Kreg K4MS so that I could build the Lego Table as outlined on the companion "buildsomething" web site which exclusively uses pocket hole construction. I have considerable experience with conventional…
ContinuePosted by Robert Ringel on September 17, 2020 at 1:48pm — 9 Comments
© 2024 Created by KregRep.
Powered by
![]()
Badges | Report an Issue | Privacy Policy | Terms of Service