Attaching large corbels to wall with Kreg screws
I would like to attach a series of large corbels to a wall to support a long shelf in a Mexican style kitchen. The shelf itself may not be so heavy, but it needs to support stacks of dishes.
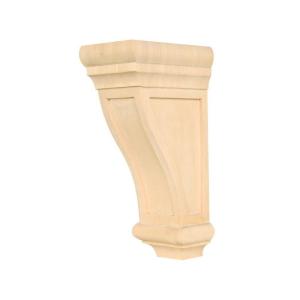
I am considering attaching the corbels (Home Depot: Kelleher 7-1/2 in. x 14 in. x 5 in. Basswood Corbel Mod...) through the drywall every 32" into studs using 2 1/2" Kreg screws, one each through the top and bottom plane of the corbels.
That is, one at a downward angle into the stud through the top of the corbel, and another into the stud at an upward angle through the bottom of the corbel.
I have not yet decided between two shelf types:
- A solid wood shelf 1 1/2" thick, in which case the corbels must support the weight of the shelf and its load of dishes. (That is, the corbels are functional, not merely decorative.)
- A hollow floating shelf (torsion box) which is itself attached directly to the studs with lag screws. It that case the corbels do not support all the weight and are more decorative than functional.

Has anyone ever attached large corbels using Kreg screws as I am suggesting? If not, what do you think of the idea anyway, as to the two shelf possibilities? That is solid shelves vs floating shelves.
Views: 8927
Replies to This Discussion
-
Permalink Reply by David Dean on
-
William David have you thought about useing pipe for shelves becouse that floating shelve is going to cut it for what you what to do with it.
-
Permalink Reply by Jay Boutwell on
-
Hi William, For what you are thinking of doing I would not depend on just kreg screws and would consider using a 1/4 " lag bolt with a flat washer. I would drill a counter sunk hole the size of the washer and then the 1/4" hole through the corbel. Once fastened tight to the wall, use a plug to plug the counter bores. I would look at the possibility of using 1/2 " flat washer in the counter bore since you can plug the holes with easy to find 1/2" dowel. The next popular size of dowel is 5/8" so bore the counter hole according to what plug material you have.
In the drilling of the holes through the corbel I would not drill the lower hole in an upward direction as all the will do is to resist pull out of the fastener. Drill them with a slight downward angle as this would cause the fastner to be pushed downward with the load on the shelf, Running the fastener upward will direct the pressure onto the threads in the direction that it will exert the forces on the thread and try to pull the thread out of the wood. Although the most of the shelf pressure will cause the shelf to tend to want to pull outward at the top and inward on the bottom there is still a load pressure directed downward.
David's suggestion about using pipe is a great idea too, and in fact I have use this method with sucess. I welded flat iron onto the ends of the pipe, drilled out some mounting holes in the flat iron. cut out the drywall and attached the pipe directly to the wall framing and then filled in around the pipe with drywall mud. If you are using the idea as you have pictured and making a floating shelf where it slips over the supporting element you will hide most if not all of the cut out and fastners without even cutting out the dry wall. It depends on the shelf construction as to where or not I would cut out the dry wall.
In my case I mounted a heavy piece of granite to a wall using epoxy to secure the granite to the pipe. I had no way of hiding the mounting surface other that cutting out the wall at the mounting surface, since it was sitting up above eye level when seated in a chair. (it was a shelf for displaying items and matched the fireplace hearth.)
If your wall surface is not drywall it will still work as long as you are able to get a firm attachment to the wall and then build the floating shelf so that it will slip over the supporting elements. The pipe will allow you to make thinner shelving that the 2" x 4" framing you have pictured above.
-
Permalink Reply by A.E. "Buddy" Holmes on
-
William, I have done this with a simple system which I transferred to new homes three times and it supported as much or more weight as you have mentioned. We had bought a nice China Cabinet upper portion but not the buffet base in a warehouse sale. We wanted to set it on a granite shelf which was ~18" longer than the cabinet and maybe 3" deeper than the cabinet. The 1" thick granite shelf itself must have weighed 50 lbs or more. Then the china cabinet and all our china service and crystal glasses was added also. There were lots of pounds and $'s. We wanted to mount the self on the wall supported by two pre-finished purchased corbels. Each was about 10" long from wall (the granite shelf was about 14"). Each was about 8" in height and 2" wide. I cut 1-1/2 sections from a 2" aluminum angle. On a lower vertical arm of the angle I drilled a hole for a 3/8" lag bolt (wood screw on end into stud and machine screw on the free end ). With double nuts locked on the lag bolt and a carefully tapped hole into the dead center of the stud, use a wrench or ratchet to screw the lag bolt into the stud. Remove the two nuts. Next on the Aluminum angle, I drilled countersunk holes for wood screws through upper horizontal arm of the angle.
I attached the angle to the wall by the lag bolt with lock washer and nut with a portion of the threaded bolt extend out from the nut. Now you are ready for the hard work. Drill a hole in the wall side of the corbel to allow the lag bolt to be covered. Chisel wood from the upper and wall end of the corbel such that it will slide over the exposed lab bolt and nut as well as the aluminum angle. Be careful to fit the upper angle into the corbel for a snug inlay fit. Slide the corbel onto the wall bracket and drill tap holes for the counter sunk wood screws to secure corbel to the aluminum angle. Install the 2nd corbel and add shelf and dishes.
The 3/8" bolts hold vertical loads. The wood screws through the angle into the corbel handle the moment load of the weight being out from the wall plane. The screw takes the shear load (use quality wood screws) and the height of the corbel back surface against the wall handles the moment. Choose a corbel that protrudes from the wall a bit more than the center of your shelf and dish weight and you are good to go. This setup survived three moves, 4 houses and 30 years of use.
.
Need Help?
For Technical Support, please call 800-447-8638 or send a message. Reps are available Monday through Friday from 8am to 5pm CST.
Popular Posts & Projects
Videos
Forum
Jig settings for 2 ¾ x 1 ½ boards with 30 degree miters?
I making a hex ring out of 2x4s ripped to 2 ¾ inches wide with 30 degree miters. What setting on the Jig should I used? 1 ½ is too much. Thanks.Continue
Started by Patrick Halinski in Kreg Jig® Operation Dec 30, 2023.
40mm Cup Hinge Jig Question
Hi All.....I have the 35mm Kreg Jig hinge drill guide. The guide is great for 35mm Hinge Cups, but I have a speciality 40MM hinge cup to drill.Has anyone adapted the Kreg guide to work with 40mm Forsner drill bits? Or have a guide that works…Continue
Started by Ed Anderson in Beginners' Zone Oct 3, 2023.
Product Reviews
New Kreg 720Pro
I saw the video Kreg put out for this new jig and had high hopes for it.
I purchased one today and am very disappointed with it.
First the docking station is extremely cheap. The plastic is pathetic. A Lego has more…
ContinuePosted by Duke Leon on February 15, 2021 at 9:00pm
Not Pleased With Pocket Hole Construction
Several months ago, I purchased the Kreg K4MS so that I could build the Lego Table as outlined on the companion "buildsomething" web site which exclusively uses pocket hole construction. I have considerable experience with conventional…
ContinuePosted by Robert Ringel on September 17, 2020 at 1:48pm — 9 Comments
© 2024 Created by KregRep.
Powered by
![]()
Badges | Report an Issue | Privacy Policy | Terms of Service